How to Properly Use a Torque Screwdriver and Common Mistakes to Avoid
How to Properly Use a Torque Screwdriver and Common Mistakes to Avoid
A torque screwdriver is an essential tool for electronics repair, DIY assembly, firearm maintenance, and bicycle servicing. It allows users to precisely control screw tightness, ensuring components remain safe and reliable. However, many beginners and casual users make common mistakes that can lead to damaged devices or inaccurate torque. This guide explains the correct usage of a torque screwdriver and highlights common pitfalls, using the Uharbour Torque Screwdriver as a practical example.
1. Set the Appropriate Torque Range
- Before starting, select the correct torque value based on screw size and material.
- Electronics usually require low torque (e.g., 0.2–5 Nm), while bicycles, firearms, or industrial tasks may need higher torque.
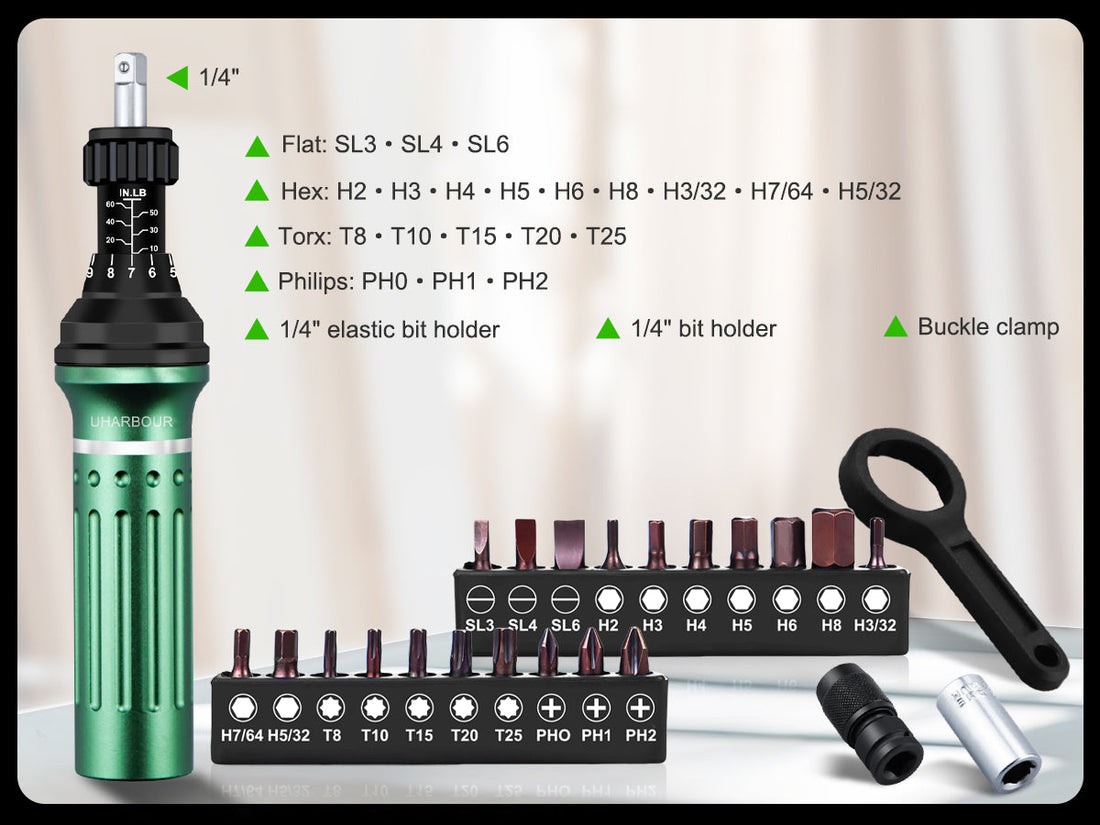
- The Uharbour Torque Screwdriver offers an adjustable torque range of 10–60 in-lb (1.6–60 Nm equivalent), making it versatile for electronics, DIY projects, bicycles, and firearms.
2. Use the Correct Bit
- Always choose a bit that matches the screw head (flat, Phillips, hex, Torx, etc.) to avoid stripping.
- The Uharbour model comes with a comprehensive set of bits, including flat (SL3, SL4, SL6), hex (H2–H8, H3/32, H7/64, H5/32), Torx (T8–T25), and Phillips (PH0–PH2), along with a 1/4-inch quick-release bit holder, ensuring broad compatibility.
3. Apply Force Smoothly and Stop at the Indicated Torque
- When the preset torque is reached, the screwdriver will give a clear click or stop.
- Do not continue applying force to avoid over-tightening.
4. Tighten Multiple Screws in the Correct Sequence
- For multi-screw assemblies like panels or heatsinks, first lightly pre-tighten screws in a cross or diagonal pattern, then gradually bring them up to the target torque.
- This ensures even pressure and prevents warping or misalignment.
5. Maintenance and Calibration
- Clean bits and handles after use to prevent dust and oil from affecting performance.
- Regular calibration is necessary for mechanical and digital torque screwdrivers to maintain accuracy.
Common Mistakes to Avoid
- Relying on “hand feel”
- Guessing tightness can lead to over- or under-tightening.
- Using a torque screwdriver eliminates guesswork, ensuring precise results.
- Ignoring torque range
- Using a screwdriver with insufficient or excessive torque can damage screws or parts.
- The Uharbour model’s adjustable torque range addresses this issue.
- Using incompatible bits
- Wrong bits can slip or strip screws.
- Choosing a set with comprehensive bits, like Uharbour’s, solves this problem.
- Tightening all screws at once
- Directly tightening multi-screw assemblies can create uneven pressure.
- Always pre-tighten, then evenly tighten to target torque.
- Neglecting calibration and maintenance
- An uncalibrated screwdriver can deviate significantly, causing loose screws or damage.
- Calibrate every 6–12 months depending on usage frequency.
Conclusion
Proper torque screwdriver use not only protects devices but also improves repair efficiency and safety:
- Key steps: choose correct torque → select correct bit → apply force smoothly → tighten in sequence → maintain and calibrate regularly.
- Avoid common mistakes, especially relying on hand feel and using incorrect bits.
For both beginners and professionals, the Uharbour Torque Screwdriver is an excellent tool:
- 10–60 in-lb adjustable torque range
- Comprehensive bit set for various screws
- Durable, lightweight, and easy to use
Whether for electronics repair, DIY projects, bicycles, or firearms, it ensures every screw is tightened precisely and reliably.